
The Ultimate Maintenance Guide
The Airstream Basecamp is the ultimate small camper for outdoor enthusiasts that live life on the brink of adventure. It’s tough, comfortable, and big enough to serve as your toy hauler and shelter. You’ll learn everything about maintaining your Airstream Basecamp in this article.
This trailer comes with a pre-wired solar kit which can help you with renewable power inputs. If you’ve hooked solar panels up to your Basecamp and are looking to maintain them — we have a separate guide dedicated to maintaining solar systems in an Airstream. For the more rugged types, check out the Airstream Basecamp X to get more out of your toy hauler off the grid.
Other features include efficient air conditioning and ventilation, hot water systems, and full cabin heating.
Disclaimer: Please confirm these suggestions with your service team, in case there are any inaccuracies within the article. If so, please contact our marketing department.
Some of the other features we’ll cover in this article include:
Guide to Maintaining an Airstream Basecamp
How to Use the Basecamp Air Conditioning and Heater Controls
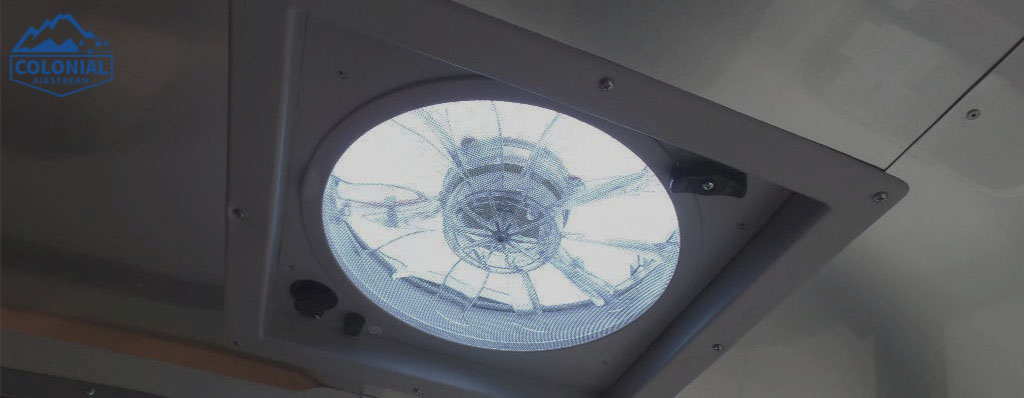
The Airstream Basecamp comes standardly equipped with a 9,000 BTU air conditioning unit. On the ceiling of your unit, you should find the unit directly overhead in the center of the walkway.
There are two control knobs in the center of the air conditioner. The forward facing knob controls the fan speed, and the other controls the heat flow. You can also use the directional controls on both sides of the AC to help direct the air to where you need it most.
To clean the filters, you can wash out the dust in the built-in sink. We recommend cleaning out the air filter once per month, depending on your usage. However, if you’re in a dusty, arid environment — you may improve air quality in your unit by cleaning the filter more often. Let the filter dry before you put it back into the air conditioner. The Basecamp relies on a combination unit which powers both the water and heating.
Truma Air Conditioning Display
All Basecamp models will have a Truma display next to the door which will control your heating and power. The Truma display will have the time display, but if you press the center knob, you will activate the heating controls.
There are four icons across the top. The first icon will allow you to control the internal temperature of your Basecamp. The second icon controls the water temperature. The third icon controls the electric and gas, allowing you to toggle the state of the electric and gas by turning it on and off. The last icon will allow you to adjust the fan speed. The fan speed controls the amount of air you send through the furnace.
 Basecamp Ventilation Controls
The Basecamp has a ventilation roof lid which you can raise with the black knob, ergonomically designed to help you keep the lid tight. There is an adjustable speed control on the corner diagonally opposed to the open knob. The speed control goes from 1 to 5; if you want to close the ventilation, there is a dip switch on the ventilation knob which will kill power to the fan.
Using the Airstream Basecamp Electric
Basecamp AC USB Ports
The Airstream Basecamp has two popup electric charging stations. One popup port is located next to the range in the galley, and the other popup port is on the other side of the galley.
Both popup ports have 110 power outlets and USB port connectors. The popup ports have a black, plastic top which is circular and has a protruding handle.
Where the power center and fuses are in a Basecamp
The Basecamp power center is located at the base of one of the couches (the couch opposite the entrance). Press on the black panel and the spring-loaded panel will open, revealing the power center.
On the left side, you will see all of the breakers for your 110 outlets. If one of your 110 outlets blows, you’ll need to reset one of the breakers here. On the right hand side, there are 12 volt fuses.
Outlet Solar and Battery
On the exterior of your Basecamp, there is a panel which houses a 110 outlet. It is on the opposite side of your vehicle’s driver side door, toward the brake lights. The 110 outlet can power your radio and components, it is GFI protected.
In the front of the trailer, there is a plug to equip your Zampp solar panel. While dry camping you can always keep your battery charged. You can run your battery while charging it as well, but if you ever need the battery disconnect switch — you’ll need to go inside the Basecamp.
The battery disconnect switch is on the wall directly across from the entrance near your feet. It is a metal switch which reads “MASTER DISCONNECT”. While in storage, you want to make sure you keep your Basecamp’s battery in the off position. In use, you’ll want to have it turned on. Keep your battery turned on while the solar panel is connected so that the voltage stays up which the battery is charging. The battery is within the adjacent storage unit behind two panels.
Power Inlet and Truma Exhaust
The Airstream Basecamp will come with a 30 AMP power cord which you can connect near the driver’s side toward the brakes. Open up the door, align the power cord to the inlet and twist. Use the tightening nut to tighten the cord. The power indicator light will turn on, showing that you have power connected to the travel trailer.
The Truma exhaust is next to the power inlet. Keep the Truma exhaust clear while you run your furnace because any obstructions could be burned by the exhaust.
Using Your Basecamp
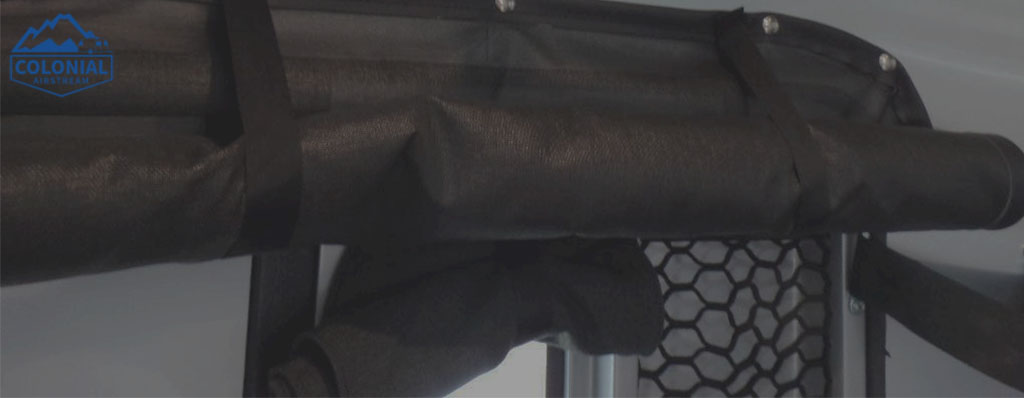
Airstream Basecamp Cargo Door Shades
Your small travel trailer comes standard with cargo door shades. On the rear of the Basecamp you’ll see the cargo loading door. This bambi is similar to a toy hauler trailer, and you’ll want to use the cargo door to load your bikes, boating equipment, or whatever else your adventure demands.
On the interior side of the door, there is a window shade which can be rolled down to cover the window. There is also a door shade at the top of the entrance which can serve as a screen door to keep bugs out.
Table to Bed Conversion
The table can be converted into a bed in under two minutes, and vice versa. You may have an easier time watching a video, demonstrating how to perform the conversion, so we recommend watching this Airstream Basecamp Walkthrough video.
Light Switches
The light switches for your toy hauler trailer are by the door. There are four switches. From the door toward the hooks, they control:
- the door
- the front of your Basecamp
- the rear of your Basecamp
- the overhead shower light
 Main Entry and Screen
There is the main door lock and a deadbolt lock, both of which should both be engaged during transit. There is a hook and latch for the door which will keep the door from closing. Underneath, there is a step to help you in and out of the bambi trailer. The step pulls straight out and down.
There is a sliding screen door on your main entry door. The two magnets can be slid out to keep the screen from sliding back and closing.
Refrigerator Controls
There is an electric-gas refrigerator with a freezer compartment at the top. At the top, there is an on and off button. The auto button will use electric first, and gas if there is no electric power. You can also press the gas button to use only gas. There is a check light to notify you if there is no gas.
Storage Spaces
The Basecamp has great storage space. There are various types of storage. Under the lounge chair on the and under on the right-hand side. There is storage on the front, both sides, with glass doors. Additionally, there is external storage by the dump valves.
Using the Built in Sink
The sink’s lid should be raise. The faucet flips up, and the controls are on the right. When traveling you’ll want to flip the faucet back down and close the lid.
Using the Range Top
Like the sink, the range has a covered lid. Open the lid. Turn the knob to the word “Light” and use the spark ignitor. It is not recommended to use a skillet over 10 inches. It is recommended to allow the burners to completely cool down before closing the lid, and always close the lid during travel.
Using the Wet Bath
There are internal locks on the door for you while you shower. The shower controls are at the bottom. The shower head is removable, and you can pass the shower head to the outside of the travel trailer if you want to shower outdoors.
Inside, there is a clothesline to hang your towel and a shower caddy for soap and shampoo. The Basecamp uses a Dometic toilet with a ceramic pool and a foot flush.
Hitching Your Basecamp
Hitchkjack and Towing Connections
The Basecamp has a hitchjack with a 2000 pound capacity at the front of the trailer. It is designed to raise and lower the trailer as needed. The emergency breakaway switch will lock your brakes if the travel trailer disconnects during transit. This is not a parking brake!
There is a 7-way cord which will control your turn signals, brakes, and if you have the hook up it can charge your battery as well.
Using stabilizer jacks
There are two stabilizing jacks on either side of the rear. Use your wrench to lower down the jacks. Once the jack is all the way down, make sure that is snug so that the trailer is level while you walk in it. Make sure the jacks are all the way up when you’re done camping so that you can avoid damaging them during transit.
Tire Pressure — Torque and Spare
The Basecamp comes with a Goodyear Assurance tire which is rated for 50PSI. Your torque should be 110 pounds. The spare tire is at the back of your Basecamp, and you can use a wrench to lower the tire to access it.
Hoses Ports and Valves
Hose Storage and Dump Valve
The hose storage is under the rear of your toy hauler. The dump hose will connect to the dump valve, and the exterior door on the side will hold your adapters. Connect your dump hose, pop off the valve cap, and open the valve. It is a combination tank, so you’ll only need to empty one container.
 How to use the Low-Pressure LP port
There is a low-pressure LP port on the front of the trailer, you can the hose from the inside of the trailer. Take the cap off the LP port, insert the hose, and open the valve. The LP port can be used for any low-pressure bottles, but do keep in mind that is is a low-pressure port.
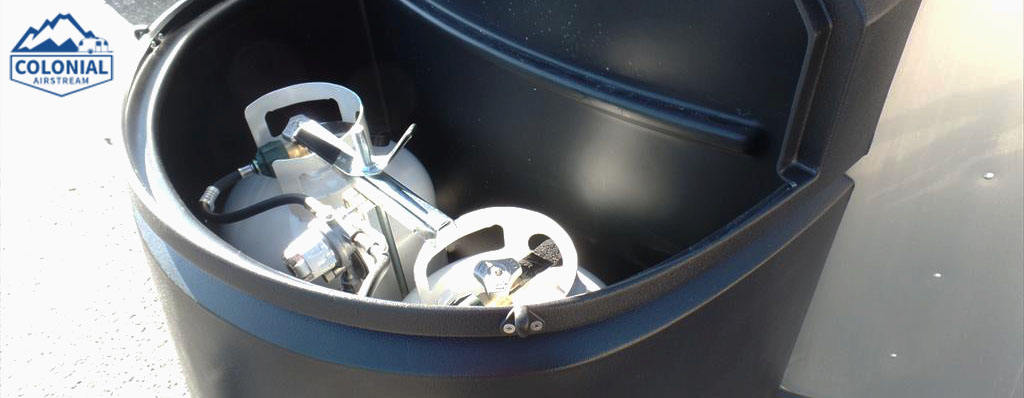
Using LP Bottles and Regulator
At the front of the Basecamp, there is storage that holds your power cord and stabilizer jack. Pull out the cord and jack, and pull the tray off. You’ll notice two LP bottles, 20 pound and a 2 stage automatic regulator. Turn the valves on and select your primary bottle. You’ll have a secondary bottle that you can turn the regulator valve to when you’re off refilling the first bottle!
Propane Gas Detector
The propane gas detector is located by the main disconnect switch. It is a safety device to detect LP gas in your trailer, to make sure that no LP gas (propane) has leaked into your trailer. The green light means it is work, the red light means that there may be LP gas in your unit. An orange light means that something has gone wrong, and you might need to have the unit serviced.
Pump and Tank Monitor
Next to your Truma display, there is a Pump & Tank monitor panel. It is a See Level II. The first button will tell you how much is left on your battery, the second button will tell you what percentage of your fresh water tank is used, and the third button tells you how much is left in your gray and black water combination tank.
The pump switch will turn on your fresh water pump. There is a green indicator light to let you know that the pump is engaged.
Tank Heater and Drain Valve
The tank heater is used in cold weather to help keep your tank from freezing. For winterization, there are two valves on the outside of the trailer. There is a freshwater tank valve and a valve for cold and hot water.
Basecamp Water Hookups
On the outside of trailer, there are two water sources. Take your 751 key to open the cap. Use a potable water hose to fill up the fresh water tank. The second hookup is for city water with a built-in regulator at 50 PSI.
Airstream Basecamp Maintenance Plan
Now that you know how to maintain your Basecamp, you should be able to plan your trip accordingly to maximize the life of your travel trailer. Of course, if you ever have any questions you can always write to us on social media or engage with us on our Contact Us page.